Showing posts with label crafts. Show all posts

Monday, August 13, 2012

How to: Faux Cabochons

Introduction:

This tutorial is just an easier way to create faux cabochons for your future jewelry projects. Purchasing glass cabochons in my opinion, is not only expensive at times, but a little nauseating when purchasing the wrong size online. 

 Using Casting Epoxy Resin You Can: seal your images for eternity, use this for any size setting, and create jewelry pieces in bulk inexpensively!

What you will need:

  • Jewelry setting (I use a variety, but for this tutorial I used plastic cameo settings found on Etsy here.)
  • Casting Resin (I used Easy Cast Clear Casting Epoxy.)
  • Mod Podge
  • Exacto Knife
  • Small Paint Brush
  • Scissors
  • An Image

Step One.
The first step is to find an image, size it down, and print it. (On most printers you can easily do this in the Printer Settings >Page Setup.) Or you could paint directly onto the cameo!!! :) So many possibilities...
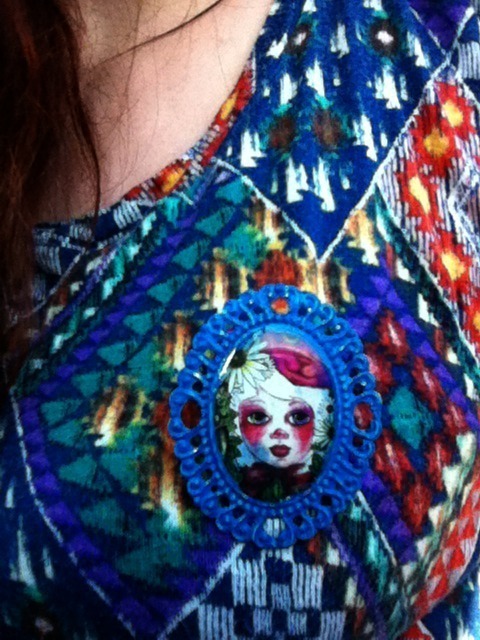
I used an image of one of my artworks.

Step Two.
Print your image. Cut it out with your scissors. But do not size down entirely just yet...

Step Three.
Instead of guessing what size you need to cut your image, start off by painting the middle of the cameo with a thin THIN layer of Mod Podge.


Step Four.
Now place your image over the cameo and FIRMLY push down on your image...

I enjoy odd compositions so I decided to focus on this part the piece.

As your press down the Mod Podge keeps the image in place and creates a visible outline where the center of the cameo will be. This outline will act as an easy guide to show you where you need to cut with your exacto knife.

Now proceed to cutting around your image. Carefully tearing the excess paper away from the cameo.


Step Five.
This is the most important part of the project. 
If you skip it, the printer ink will bleed and ruin the whole brooch.
After you have carefully extracted the excess paper from the cameo, your next step will be to seal it start sealing your image.

  • With your CLEAR ACRYLIC SPRAY PAINT, spray your cameo LIGHTLY from at least one foot away from the cameo. Do not use it at close range or continuously spray it. This will cause the ink to bleed. Let it dry. Then Spray again.


  • After the clear acrylic spray paint has completely dried. Use a small paint brush and paint a THIN layer of Mod Podge over your image. Wait for the Mod Podge to completely dry, then repeat the process again.


Step Six.
Wait for the cameo to completely dry before moving onto the next step.

Step Seven.
Now it is time to seal the cameo forever with EASY CAST CLEAR CASTING EPOXY.
Measure out both equal parts of the resin and hardener. I used less than a teaspoon for both.
MIX WELL.
If you mix this stuff really good, it will help eliminate bubbles that arise during the chemical process.


Step Eight.
Pour the resin onto your image.
WATCH YOUR RESIN.
It should spread out by itself slowly, so make sure you do not use a lot or it could seep out of the middle and onto the framed areas. 

Step Nine.
If the resin is set correctly it should look like it is slightly bulging outward, convex.
During this time bubbles will rise to the top and pop, nothing to fret over in the beginning.
It usually takes 24 hours to cure so now it is time for the waiting game.


Fin.
After the resin has cured YOU ARE FINALLY FINISHED!!!
Now you can wear any piece of art!!!


Misc. Examples:


Tuesday, November 29, 2011

I Love Handmade: Handmade Rug

Handmade Rug


So...I really wanted to make a colorful scalloped rug. This was my first sort of "experiment" which resulted in a small prototype. I really just wanted to see if the felt pieces would work out in the design...and also withstand the massive amounts of animal hair floating around. It passed that test for sure.


My son is in love with this small version. I plan on uploading my pattern and maybe give some tips on making this very quirky and inexpensive rug.

Monday, August 22, 2011

Shrink Plastic Brooch


My new craft love...shrink plastic. I was surprised to see how much fun these things really are to make! Using just frosted shrink paper, colored pencils, and a microwave oven, creating a customized brooch is very easy. The opposite side is felted, and a pin back was applied to the back.

Tuesday, June 28, 2011

Dinosaur Planter Tutorial


Image from Plaid Pigeon's Facebook Page

Have you seen these quirky planters on Etsy yet? The ones above were created by Plaid Pigeon (shop inactive now).
Well it just so happens that they are very easy,FUN, and inexpensive to make!


What you will need:

-Exacto Knife
-Plastic Dinosaur (You can find these at Walmart and Toys R Us)
-Sewing Needle


Step One

The plastic dinosaur. I bought this one from Walmart for one dollar.
  Not necessary but: I didn't like the color it originally came in, which was a sort of distressed bluish/purple. I painted this dino red (for some complimentary color action) with acrylics and sprayed a clear finish over it. 

Step Two

Take your Exacto Knife and cut a hole in the back of the dinosaur...just like carving a pumpkin...except this is plastic....and a tad bit harder.

Step Three

 Thankfully the dinosaurs are hollow inside so really all the hard work is over with. I made the hole in my little guy approximately 4-5 inches wide (don't worry about the edges around the hole because your plant should cover it up). You can now put soil and your plant inside.

Step Four

After I placed the soil and plant inside I took a sewing needle (with much applied force) to make holes in the bottom which will expel some water. Make sure the hole is deep enough.

FIN!

This is what yours should look similar to in the end. EPIC!!!!

Tuesday, October 26, 2010

Creation Machines

At least that is what it feels like where I live. My boyfriend's mom draws, can knit and make all sorts of things, as well as her daughter (who is also a tattoo artist). I love the creative environment here.

My first hand-carved stamp!

Drop-stitch scarf.
Scrap fabric...into a hair bow!

Tuesday, October 12, 2010

Handmade Belt

For a long time I have been really obsessed with belts, especially those with pyramid studs. I have fed this obsession by buying belt after belt after belt after belt, even though they all looked the same I still bought them. Now that I have so many I can't find any interesting ones that would be worth getting because I basically already have them all. I wanted a floral one and I kept googling and I could never find one. So I though about just making one in hopes I would figure it out.

First off I drew up what I wanted because I work well when I have a visual of something first.

Then I shopped around at Hobby Lobby for the most desirable fabric to use and I was excited when I found what I wanted. I ordered a few belts off the internet because even with shipping, it is still a hell of a lot cheaper than a store bought belt. I even bought the pyramid studs off the internet, because just as I had imagined, the studs in the belt that I bought were of shitty plastic.

Getting rid of the crappy plastic studs

I spray painted the metal studs I had bought, I used two different colors to achieve the vintage, old-feel I was going for. I was really thrilled when they came out exactly how I wanted them too.


Putting fabric on and sewing it to the belt was the easy part, re-assembling all the parts I took out of it was the first hard part I had went though. I had to figure out how to actually get things to stay and be permanent so they wouldn't fall out later on.

Putting the metal studs in the old holes of the belt was the hardest part and actually took a long time, it is too hard to get the studs to stay straight and fit exactly right.

I am satisfied that my first belt turned out the way it did, I hope to make a lot of improvements on my next one.


The next one I am making is a rabbit belt. It is kind of wonderland inspired I suppose, I will post it as soon as I am done. I'm currently figuring out how to make a lot of different things that I can not find on the internet or anywhere else.

I have entered an art show literally called Recycled Art Show. I plan on entering a 2-d project. My idea is just making a collage using paper bags, but I will be using paint over them...just so I can have something actually recycled being used in my work.

Plastic bags are ruining our environment, I literally fucking hate them. If you want you can search anything about plastic bags and find all sorts of negative results.

I have drawn up what I want my collage to be of, and I have taken an approach toward Ocean Wildlife as a result from watching The Cove in my English class. I hope to have a very controversial piece in the show because I plan on making it a bit on the gore side.