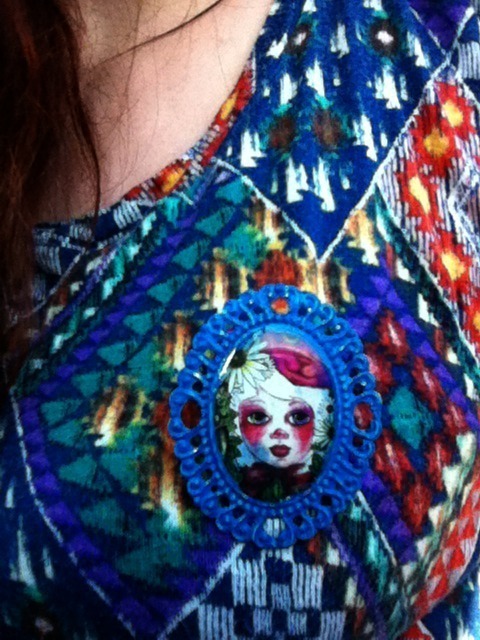
My friend and I spent the entire summer attempting to cover "the square" in our town with stickers.
Showing posts with label art. Show all posts
Friday, September 7, 2012
Monday, August 13, 2012
How to: Faux Cabochons
Introduction:
This tutorial is just an easier way to create faux cabochons for your future jewelry projects. Purchasing glass cabochons in my opinion, is not only expensive at times, but a little nauseating when purchasing the wrong size online.
Using Casting Epoxy Resin You Can: seal your images for eternity, use this for any size setting, and create jewelry pieces in bulk inexpensively!
What you will need:
- Jewelry setting (I use a variety, but for this tutorial I used plastic cameo settings found on Etsy here.)
- Casting Resin (I used Easy Cast Clear Casting Epoxy.)
- Mod Podge
- Exacto Knife
- Small Paint Brush
- Scissors
- An Image
Step One.
The first step is to find an image, size it down, and print it. (On most printers you can easily do this in the Printer Settings >Page Setup.) Or you could paint directly onto the cameo!!! :) So many possibilities...
I used an image of one of my artworks.
Step Two.
Print your image. Cut it out with your scissors. But do not size down entirely just yet...
Step Three.
Instead of guessing what size you need to cut your image, start off by painting the middle of the cameo with a thin THIN layer of Mod Podge.
Step Four.
Now place your image over the cameo and FIRMLY push down on your image...
I enjoy odd compositions so I decided to focus on this part the piece.
As your press down the Mod Podge keeps the image in place and creates a visible outline where the center of the cameo will be. This outline will act as an easy guide to show you where you need to cut with your exacto knife.
Now proceed to cutting around your image. Carefully tearing the excess paper away from the cameo.
Step Five.
This is the most important part of the project.
If you skip it, the printer ink will bleed and ruin the whole brooch.
After you have carefully extracted the excess paper from the cameo, your next step will be to seal it start sealing your image.
- With your CLEAR ACRYLIC SPRAY PAINT, spray your cameo LIGHTLY from at least one foot away from the cameo. Do not use it at close range or continuously spray it. This will cause the ink to bleed. Let it dry. Then Spray again.
- After the clear acrylic spray paint has completely dried. Use a small paint brush and paint a THIN layer of Mod Podge over your image. Wait for the Mod Podge to completely dry, then repeat the process again.
Step Six.
Wait for the cameo to completely dry before moving onto the next step.
Step Seven.
Now it is time to seal the cameo forever with EASY CAST CLEAR CASTING EPOXY.
Measure out both equal parts of the resin and hardener. I used less than a teaspoon for both.
MIX WELL.
If you mix this stuff really good, it will help eliminate bubbles that arise during the chemical process.
Step Eight.
Pour the resin onto your image.
WATCH YOUR RESIN.
It should spread out by itself slowly, so make sure you do not use a lot or it could seep out of the middle and onto the framed areas.
Step Nine.
If the resin is set correctly it should look like it is slightly bulging outward, convex.
During this time bubbles will rise to the top and pop, nothing to fret over in the beginning.
It usually takes 24 hours to cure so now it is time for the waiting game.
Fin.
After the resin has cured YOU ARE FINALLY FINISHED!!!
Now you can wear any piece of art!!!
Misc. Examples:
Sunday, June 10, 2012
Saturday, January 21, 2012
Oh, wow. I have been inactive for TOO long. Blogger changed!? Whoa...
It is sad to say that not much has happened since my last post, I'm still taking my general courses (which sucks out the creative energy in me), so that's fun. I did however discover a new love for poetry. :)
My son is also discovering the magical world of ART.
Tuesday, November 29, 2011
I Love Handmade: Handmade Rug
Handmade Rug
So...I really wanted to make a colorful scalloped rug. This was my first sort of "experiment" which resulted in a small prototype. I really just wanted to see if the felt pieces would work out in the design...and also withstand the massive amounts of animal hair floating around. It passed that test for sure.
My son is in love with this small version. I plan on uploading my pattern and maybe give some tips on making this very quirky and inexpensive rug.
Tag's
art,
color block,
colorful,
crafts,
diy,
handmade,
indie handmade,
rug,
scalloped rug diy
Wednesday, November 16, 2011
Sunday, October 2, 2011
A Little Off Topic But...
...if you dig funky designs...you might just dig these too!
Awhile back I wrote about these quirky tights and have received lots and LOTS of e-mails asking who they were made by. I didn't know at that time who created them BUT....a few weeks ago I tried locating them again on Tin Eye (which is a reverse image look up) and finally found a link!
I am glad to have discovered the company behind these whimsical tights...
Les Queues de Sardines (The Tail Sardines)
About:
"Les Queues de Sardines, a registered trademark of the m + o studio, is offering an original range of stockings and tights notable for their unconventional and unique graphic style. Add a pinch of narrative humor - the result is a choice of elegant and unusual models that will dress up your legs with an unusual stylish and elegant pattern. Screen-printed by hand in limited quantities, these rare and exclusive articles will never go unnoticed."
Showcase
I am down for anything unusual and artsy... but these especially are complete genius!
The thing I adore most about these are the creativity and imagination involved. These would definitely make a fashion statement.
This really makes me want to learn how to screen-print ASAP. I can guess the whole process as super hard to the max...tights are just so darn delicate. If anyone has some clues to this let me know! Your art on pantyhose? That thought is beyond awesome.
I e-mailed them to find out if they had an online store...because I couldn't locate any on their website. They sent me this link:
L'exception
Other online stores also carry their collections:
Greenky
Luna & Curious
L'exception
Other online stores also carry their collections:
Greenky
Luna & Curious
If you haven't guessed by now..(especially with each of these being screen-printed by hand)...these tights are expensive. You are looking at a price range from $60-$80.
Saturday, October 1, 2011
Step Right Up
![]() |
| Fawn Boy- Ink and Prismacolor Pencils |
My sister said that this drawing has a sort of "creepy" aspect to it. I'm glad for that.
If you are in the mood for a little spontaneous inspiration, I will share with you a few artists whose work that has been deemed creepy. I find them to be absolutely lovely.
![]() |
| Martin Wittfooth |
![]() |
| Vania Zouraliov |
![]() |
| Gustav Adolf Mossa (1883 |
![]() |
| Hikari Shimoda |
![]() |
| Dorothea Tanning |
![]() |
| Jean Marembert |
![]() |
| Suehiro Maruo (weirdest horror manga...by far.) |
![]() |
| Domenico Gnoli (1933-1970) |
Well...I could go on and on and on and on and on but...I don't want to bore you to death. The artists mentioned above have many other weird artworks. I am telepathically suggesting that they would be worth researching more into. Well that wraps it up I am off to play catch up on Blogger.
Friday, September 30, 2011
Monday, August 22, 2011
Shrink Plastic Brooch
My new craft love...shrink plastic. I was surprised to see how much fun these things really are to make! Using just frosted shrink paper, colored pencils, and a microwave oven, creating a customized brooch is very easy. The opposite side is felted, and a pin back was applied to the back.
Friday, August 5, 2011
Free Crappy Portraits
I found out about this awesome site from Kat at Zanni Plain Jane Fashion...
It is called Free Crappy Portraits and it is exactly what it sounds like!
I submitted just a random photo of myself just to see what they would come up with and a few weeks later they sent me my free drawing!!!
Haha. I love it.
You should definitely check it out.
Saturday, July 9, 2011
Pinback Buttons
Pinback buttons. www.shaylafish.etsy.com
Gosh guys...I really haven't been blogging as much as I'd like to....and I miss everyone.
I have been super Super SUPERRRRRRRRR busy...no time to do the things I want to do.
I recently started on a new belt. I love studded belts but I'd rather make my own with different designs. This one I am using a kitsch fabric with purple pyramid studs. It is a hard, long, annoying, and painful process;but when the belt is finished and I wear it out in public, everyone asks me where I bought it. I have the joy of telling them that I made it myself! :)
Subscribe to:
Posts (Atom)