


Introduction:
This tutorial is just an easier way to create faux cabochons for your future jewelry projects. Purchasing glass cabochons in my opinion, is not only expensive at times, but a little nauseating when purchasing the wrong size online.
Using Casting Epoxy Resin You Can: seal your images for eternity, use this for any size setting, and create jewelry pieces in bulk inexpensively!
What you will need:
- Jewelry setting (I use a variety, but for this tutorial I used plastic cameo settings found on Etsy here.)
- Casting Resin (I used Easy Cast Clear Casting Epoxy.)
- Mod Podge
- Exacto Knife
- Small Paint Brush
- Scissors
- An Image
Step One.
The first step is to find an image, size it down, and print it. (On most printers you can easily do this in the Printer Settings >Page Setup.) Or you could paint directly onto the cameo!!! :) So many possibilities...

I used an image of one of my artworks.
Step Two.
Print your image. Cut it out with your scissors. But do not size down entirely just yet...
Step Three.
Instead of guessing what size you need to cut your image, start off by painting the middle of the cameo with a thin THIN layer of Mod Podge.

Step Four.
Now place your image over the cameo and FIRMLY push down on your image...
I enjoy odd compositions so I decided to focus on this part the piece.
As your press down the Mod Podge keeps the image in place and creates a visible outline where the center of the cameo will be. This outline will act as an easy guide to show you where you need to cut with your exacto knife.
Now proceed to cutting around your image. Carefully tearing the excess paper away from the cameo.

Step Five.
This is the most important part of the project.
If you skip it, the printer ink will bleed and ruin the whole brooch.
After you have carefully extracted the excess paper from the cameo, your next step will be to seal it start sealing your image.
- With your CLEAR ACRYLIC SPRAY PAINT, spray your cameo LIGHTLY from at least one foot away from the cameo. Do not use it at close range or continuously spray it. This will cause the ink to bleed. Let it dry. Then Spray again.
- After the clear acrylic spray paint has completely dried. Use a small paint brush and paint a THIN layer of Mod Podge over your image. Wait for the Mod Podge to completely dry, then repeat the process again.

Step Six.
Wait for the cameo to completely dry before moving onto the next step.
Step Seven.
Now it is time to seal the cameo forever with EASY CAST CLEAR CASTING EPOXY.
Measure out both equal parts of the resin and hardener. I used less than a teaspoon for both.
MIX WELL.
If you mix this stuff really good, it will help eliminate bubbles that arise during the chemical process.

Step Eight.
Pour the resin onto your image.
WATCH YOUR RESIN.
It should spread out by itself slowly, so make sure you do not use a lot or it could seep out of the middle and onto the framed areas.

Step Nine.
If the resin is set correctly it should look like it is slightly bulging outward, convex.
During this time bubbles will rise to the top and pop, nothing to fret over in the beginning.
It usually takes 24 hours to cure so now it is time for the waiting game.

Fin.
After the resin has cured YOU ARE FINALLY FINISHED!!!
Now you can wear any piece of art!!!

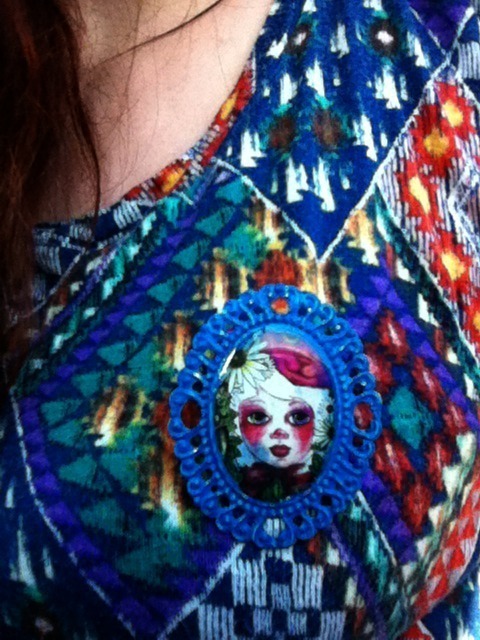
Misc. Examples:

5 comments:
That looks really cool!
Thanks for the tutorial, might try this sometime if I ever find all the materials. ^-^
// Virtual Boy
Hey great tutorial!! The Brooch is gorgeous! And I love your latest blog layout :) (I have been missing from blogger for a while so I havent been visiting you!) :D
Hey great tutorial!! The Brooch is gorgeous! And I love your latest blog layout :) (I have been missing from blogger for a while so I havent been visiting you!) :D
This is fabulous! Thank you so much for sharing. I had to pin it.
Hugs
Caroline
I'm so glad you posted this! I've been wondering how to do this for ages. I keep seeing Mab's brooches and want to make my own, so now I totally can!
Post a Comment